css3 animation沿椭圆轨道旋转运动_css3椭圆轨迹转动-CSDN博客
一些废话:
很久没有更博了,主要原因是由于使用git工具push的时候,自己的私人账号和工作的git账号总是冲突,每次明明切换过了账号,可是push的时候却用的是错误的账号,找不到解决办法。最近得知github有桌面版,终于不会再冲突了!
前言
最近工作上遇到一个项目有两张banner,都需要实现围绕椭圆旋转的动画效果。


拿到这个需求,第一反应是用animation应该很容易实现。脑袋里的思路是,先实现沿正圆运动,再进行3D旋转即可。然而,我得到的效果是:Demo
<!DOCTYPE html><html lang="en"><head> <meta charset="UTF-8"> <title>Document</title> <style> *{ padding: 0; margin: 0; } .wrap{ padding: 0 20px; margin-top: -80px; height: 320px; } .box{ width: 400px; height: 400px; border: 1px solid #333; border-radius: 100%; position: relative; box-sizing: border-box; transform: rotateX(60deg); } .dot{ width: 20px; height: 20px; background: red; border-radius: 100%; position: absolute; left: 200px; top: -10px; transform-origin: 0 210px; animation: move 8s linear infinite; } @keyframes move{ 0%{ transform: rotate(0deg); } 100%{ transform: rotate(360deg); } } </style></head><body> <div class="wrap"> <div class="box"> <div class="dot"></div> </div> </div></body></html>吐血的小圆球。。。是平面的,进行了3D旋转,看上去就是椭圆了!
踩过的坑
思考了许久找不到解决办法,于是只好google啦,然后我就找到了这个案例 https://codepen.io/yincheng/pen/QjMzZr ,本以为是惊喜,结果是“厄运”,因为花费了很多时间去研究却最终弃用。使用案例中的代码,若圆球较大看似没什么问题,但是当圆球很小的时候怎么都对不准轨道。。。
这个案例的原理是CSS分层动画可以让元素沿弧形路径运动,然而如果想要围绕标准的椭圆运动,需要调整动画的贝塞尔曲线,好像是需要通过公式计算,而且每个轨道的椭圆都不同,这种方法的难度和工作量似乎有点大,我只好放弃。
解决办法
后来我又搜到了一个案例: https://codepen.io/ghost028/pen/bEBKXZ ,这个案例跟我最初想到的思路差不多,不过小圆球在运动的过程中也要不断进行3D旋转,就能让它视觉上一直都是一个圆。效果还是很不错的:Demo
<!DOCTYPE html><html lang="en"><head> <meta charset="UTF-8"> <title>Document</title> <style> .ellipse { width: 160px; height: 160px; border-radius: 50%; position: absolute; border: 2px #555 solid; transform-style: preserve-3d; transform: rotateZ(60deg) rotateY(70deg); } .ellipse .circle { width: 20px; height: 20px; border-radius: 50%; top: 0; left: 0; right: 0; bottom: 0; margin: auto; position: absolute; background: #555; animation: move 10s linear infinite; } .ellipse .circle2{ animation: move2 10s linear infinite; } .ellipse .circle3{ animation: move3 10s linear infinite; } .ellipse .circle4{ animation: move4 10s linear infinite; } @keyframes move { from { transform: rotateZ(0) translateX(80px) rotateZ(0) rotateY(-70deg); } to { transform: rotateZ(360deg) translateX(80px) rotateZ(-360deg) rotateY(-70deg); } } @keyframes move2 { from { transform: rotateZ(-180deg) translateX(80px) rotateZ(180deg) rotateY(-70deg); } to { transform: rotateZ(180deg) translateX(80px) rotateZ(-180deg) rotateY(-70deg); } } @keyframes move3 { from { transform: rotateZ(-90deg) translateX(80px) rotateZ(90deg) rotateY(-70deg); } to { transform: rotateZ(270deg) translateX(80px) rotateZ(-270deg) rotateY(-70deg); } } @keyframes move4 { from { transform: rotateZ(-270deg) translateX(80px) rotateZ(270deg) rotateY(-70deg); } to { transform: rotateZ(90deg) translateX(80px) rotateZ(-90deg) rotateY(-70deg); } } </style></head><body> <div class="ellipse"> <div class="circle circle1"></div> <div class="circle circle2"></div> <div class="circle circle3"></div> <div class="circle circle4"></div> </div></body></html>问题延伸
所以第一张banner就用此方法完美解决,当我准备用这个方法做第二张banner的时候,我突然发现了一些问题。
在上一张banner中,要旋转的元素是和轨道我用的是同一个颜色,如果不是同样的颜色呢?我们会发现,轨道其实是”插入“圆形里面的。Demo
<!DOCTYPE html><html lang="en"><head> <meta charset="UTF-8"> <title>Document</title> <style> .ellipse { width: 160px; height: 160px; border-radius: 50%; position: absolute; border: 2px #555 solid; transform-style: preserve-3d; transform: rotateZ(60deg) rotateY(70deg); } .ellipse .circle { width: 20px; height: 20px; border-radius: 50%; top: 0; left: 0; right: 0; bottom: 0; margin: auto; position: absolute; background: red; animation: move 10s linear infinite; font-size: 12px; color: #fff; text-align: center; line-height: 20px; } .ellipse .circle span{ display: block; transform: rotateZ(-60deg); /* 再次旋转 */ } .ellipse .circle2{ animation: move2 10s linear infinite; } .ellipse .circle3{ animation: move3 10s linear infinite; } .ellipse .circle4{ animation: move4 10s linear infinite; } @keyframes move { from { transform: rotateZ(0) translateX(80px) rotateZ(0) rotateY(-70deg); } to { transform: rotateZ(360deg) translateX(80px) rotateZ(-360deg) rotateY(-70deg); } } @keyframes move2 { from { transform: rotateZ(-180deg) translateX(80px) rotateZ(180deg) rotateY(-70deg); } to { transform: rotateZ(180deg) translateX(80px) rotateZ(-180deg) rotateY(-70deg); } } @keyframes move3 { from { transform: rotateZ(-90deg) translateX(80px) rotateZ(90deg) rotateY(-70deg); } to { transform: rotateZ(270deg) translateX(80px) rotateZ(-270deg) rotateY(-70deg); } } @keyframes move4 { from { transform: rotateZ(-270deg) translateX(80px) rotateZ(270deg) rotateY(-70deg); } to { transform: rotateZ(90deg) translateX(80px) rotateZ(-90deg) rotateY(-70deg); } } </style></head><body> <div class="ellipse"> <div class="circle circle1"><span>一</span></div> <div class="circle circle2"><span>丢</span></div> <div class="circle circle3"><span>丢</span></div> <div class="circle circle4"><span>萌</span></div> </div></body></html>虽然在这个项目中,第二张banner的轨道可以忽略,两张banner都可以用上面的解决办法,但是我并不甘心。
为什么不可以直接让元素沿着一条轨道运动呢?我能否“绘制”一个椭圆的N个坐标,让元素沿着这些坐标运动?先从最简化的开始,假如椭圆只有四个坐标,小圆球沿着这四个坐标运动,就是下面这样:Demo
<!DOCTYPE html><html lang="en"><head> <meta charset="UTF-8"> <title>Document</title> <style> .ellips { width: 400px; height: 200px; border-radius: 100%; border: 1px solid #333; position: relative; } .x-axis { position: absolute; width: 400px; height: 1px; left: 0; top: 100px; background: #333; } .y-axis { position: absolute; width: 1px; height: 200px; left: 200px; top: 0; background: #333; } .dot { width: 20px; height: 20px; left: 190px; top: 90px; background: red; border-radius: 100%; position: absolute; animation: move 10s linear infinite; } @keyframes move { 100% { transform: translate(200px, 0px); } 75% { transform: translate(0px, -100px); } 50% { transform: translate(-200px, 0px); } 25% { transform: translate(0px, 100px); } 0% { transform: translate(200px, 0px); } } </style></head><body> <div class="ellips"> <div class="x-axis"></div> <div class="y-axis"></div> <div class="dot"></div> </div></body></html>那么以此类推,把坐标的数量不断增加,小圆球沿轨道运动就会越来越精细。要获得椭圆坐标,需要用到数学公式。
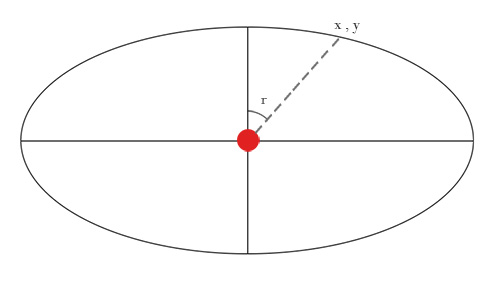
高中数学已经基本忘光了o(╯□╰)o,我在网上找到了椭圆的坐标公式:
x=a*cosr
y=b*sinr
已知椭圆的长半径a和短半径b,可以根据角度r来得到椭圆轨道的x坐标和y坐标。
如果用css来断点,数量过多,非常麻烦,所以用less就方便了很多,以下是重点代码:
@a : 160px; // 椭圆x轴半径(长半径)@b : 80px; // 椭圆y轴半径(短半径)@s : 40; // 坐标点的数目(数目越大,动画越精细) .loop(@index) when (@index < @s+1) { .loop((@index + 1)); @keyframeSel: @index * 100%/@s; // keyframes断点 @{keyframeSel}{ transform: translate(@a*cos(360deg/@s*@index),@b*sin(360deg/@s*@index),); }} @keyframes move{ .loop(0);}运行效果请看codePen:
Less: @a : 160px; // 椭圆x轴半径(长半径)@b : 80px; // 椭圆y轴半径(短半径)@s : 40; // 坐标点的数目(数目越大,动画越精细) .ellips{ width: @a*2 ; height: @b*2; border-radius: 100%; border: 1px solid #333; position: relative; margin: 30px 0 0 20px;}.dot{ width: 20px; height: 20px; left: @a - 10px; top: @b - 10px; background: red; border-radius: 100%; position: absolute; animation: move 10s linear infinite;} .loop(@index) when (@index < @s+1) { .loop((@index + 1)); @keyframeSel: @index * 100%/@s; @{keyframeSel}{ transform: translate(@a*cos(360deg/@s*@index),@b*sin(360deg/@s*@index),);}} @keyframes move{ .loop(0);} HTML: <div class="ellips"> <div class="dot"></div></div>参考资料:
loops - How to iterate keyframe percentages Less CSS - Stack Overflow
Moving along a curved path in CSS with layered animation | Tobias Ahlin
—— end ——
原网址: 访问
创建于: 2023-10-12 17:37:38
目录: default
标签: 无
未标明原创文章均为采集,版权归作者所有,转载无需和我联系,请注明原出处,南摩阿彌陀佛,知识,不只知道,要得到


最新评论